
Proton Mail and Route-53 DNS
A step-by-step guide for setting up an AWS Route-53 domain name for use with Proton Mail.

Having a Proton Unlimited or higher account for Proton Mail means you can set up email based on your own domain name. The procedure involves setting up multiple MX and TXT records in DNS, which can be tricky depending on your domain registration service and the tools they provide. Proton has documented the procedure, but the description isn't specific enough to give you a straightforward recipe.
I have done it several times based on domain names registered with AWS Route 53, and it involved quite some trial-and-error. Below I describe how it's done.
Preliminaries
The following assumes you own an AWS account, have access to the AWS Console (i.e. the admin web interface AWS provides) for that account, and have registered a domain name with Route 53. You can then go to Route 53 > Hosted Zones and click on the domain name you want to configure for email.
Step 1: Verification
Proton needs you to verify that you are in control of the domain and can set up a harmless TXT record before it lets you go further steps.
For this you set up a TXT record with empty subdomain. Let's say your domain is example.com, then you define a TXT record for the pure domain (empty string for subdomain) and the value that Proton asks you to use:
"protonmail-verification=ea91f1b81f6c5d0c099b3ebf331fb673b777ec5e"
(The specific value will be different in your case.)
The configuration screen in AWS looks like this (you might have zoom in to see the details):
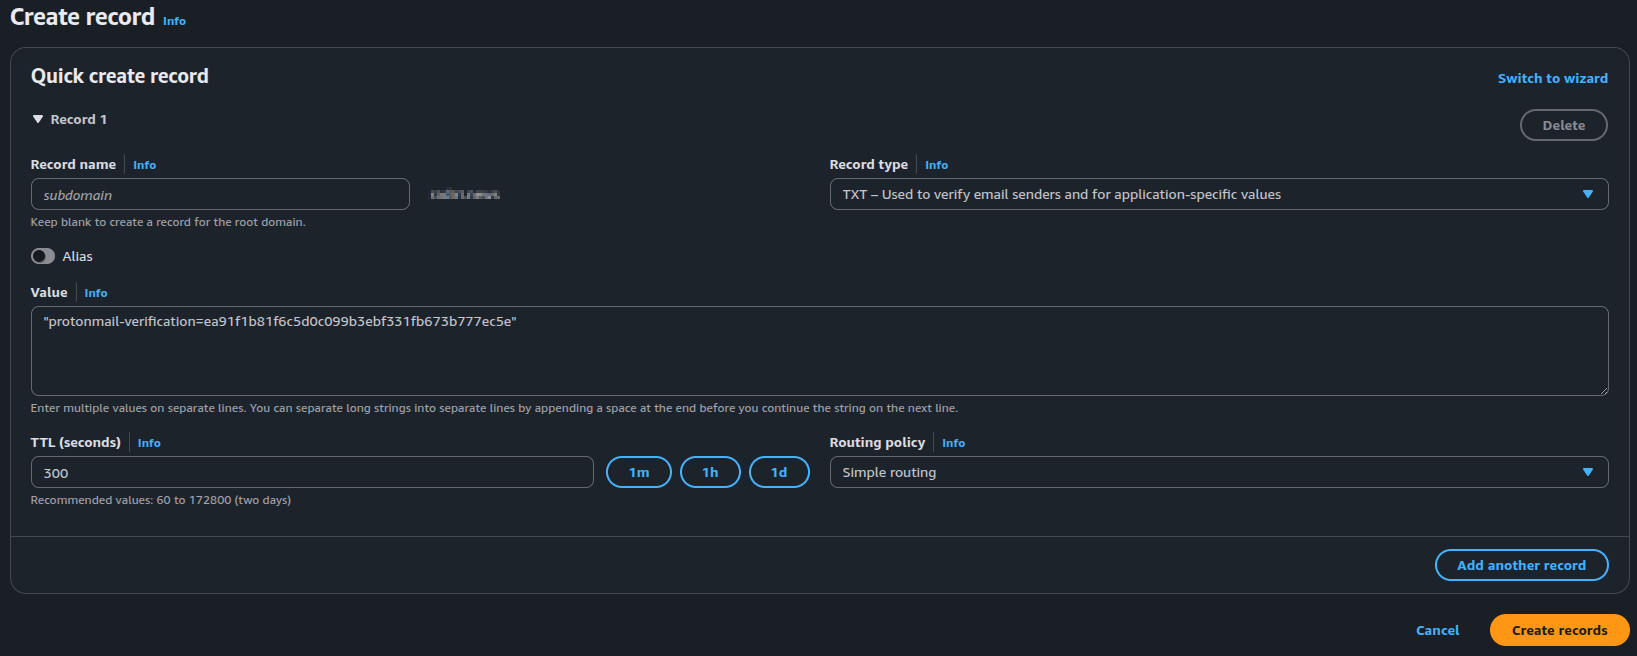
Proton suggests using @ as subdomain (host) name, but I found that is not a good idea. Where possible, avoid using the @ host names suggested by Proton. (There is one instance below where you cannot avoid it, and that is ok.)
Step 2: Define an Email Address in Proton
You do this in the Settings > Identity and addresses section of the Proton account information. Define the specific address you'd like to use, such as me@example.com. It won't work yet, but Proton wants you first to define it in Proton and then set the actual DNS redirect to Proton. This is particularly important when you have been using that address with another service before, and you are moving it to Proton. By first defining it in Proton and then setting the DNS record you avoid losing email that gets sent to Proton before Proton knows about the email identity.
Step 3: The MX Record
MX records are the ones that trigger that actual sending of emails to the Proton server. Proton wants you to set two MX records at priority levels 10 and 20, respectively:
10 mail.protonmail.ch
20 mailsec.protonmail.ch
Technically, Route 53 allows you to set both (separated by newline) as a single record, but such a configuration isn't effective. Proton will, after a while, warn you that the setup isn't working, and you will in fact never receive email through Proton this way.
So you have to set up two distinct records, and that is not possible if both have the same (empty) subdomain name. So here you set up the priority-10 one with an empty subdomain, and the priority-20 one with the @ subdomain. That set up works:
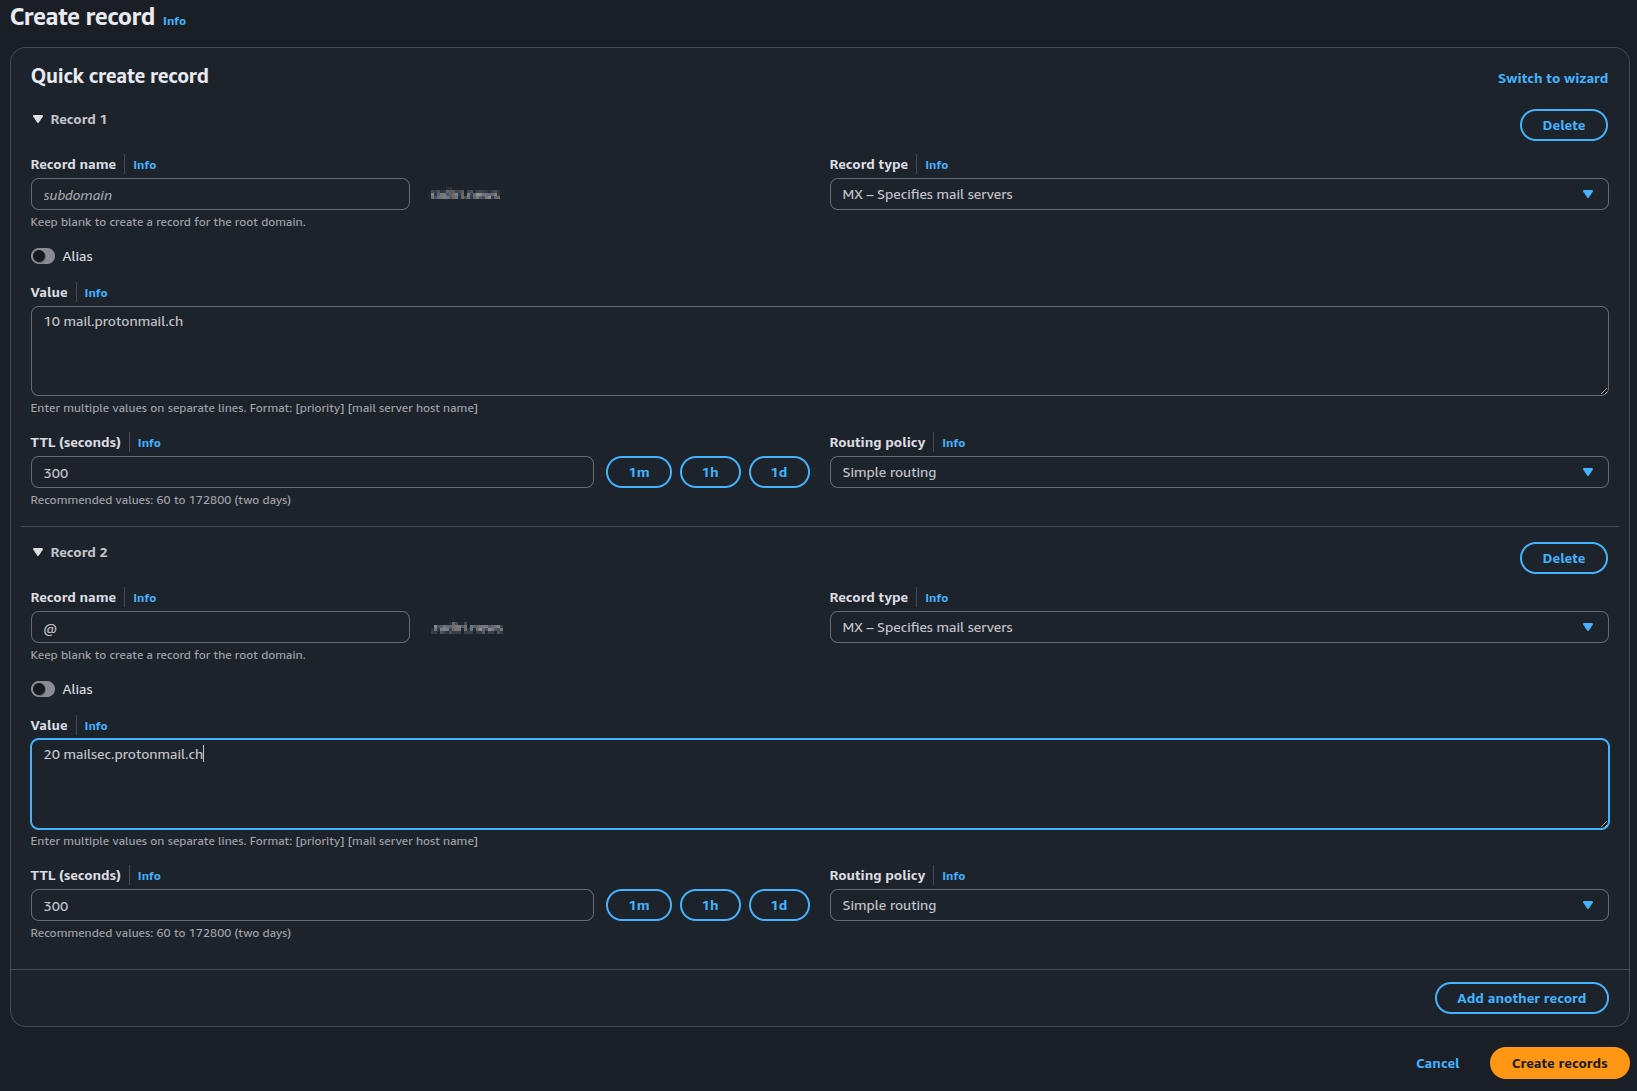
(You get this by first creating one record and then using the "Add another record" button. Alernatively, you can create them one after the other.)
Step 4: Other TXT Records
Proton requires further TXT records to prevent spoofing and for DMARC.
The anti-spoofing entry you should add as as additional line to the TXT record you created in Step 1 above, rather than create a separate record. (If you also want to send emails under your domain from services other than Proton, you can add further anti-spoofing lines for those services to the record.)
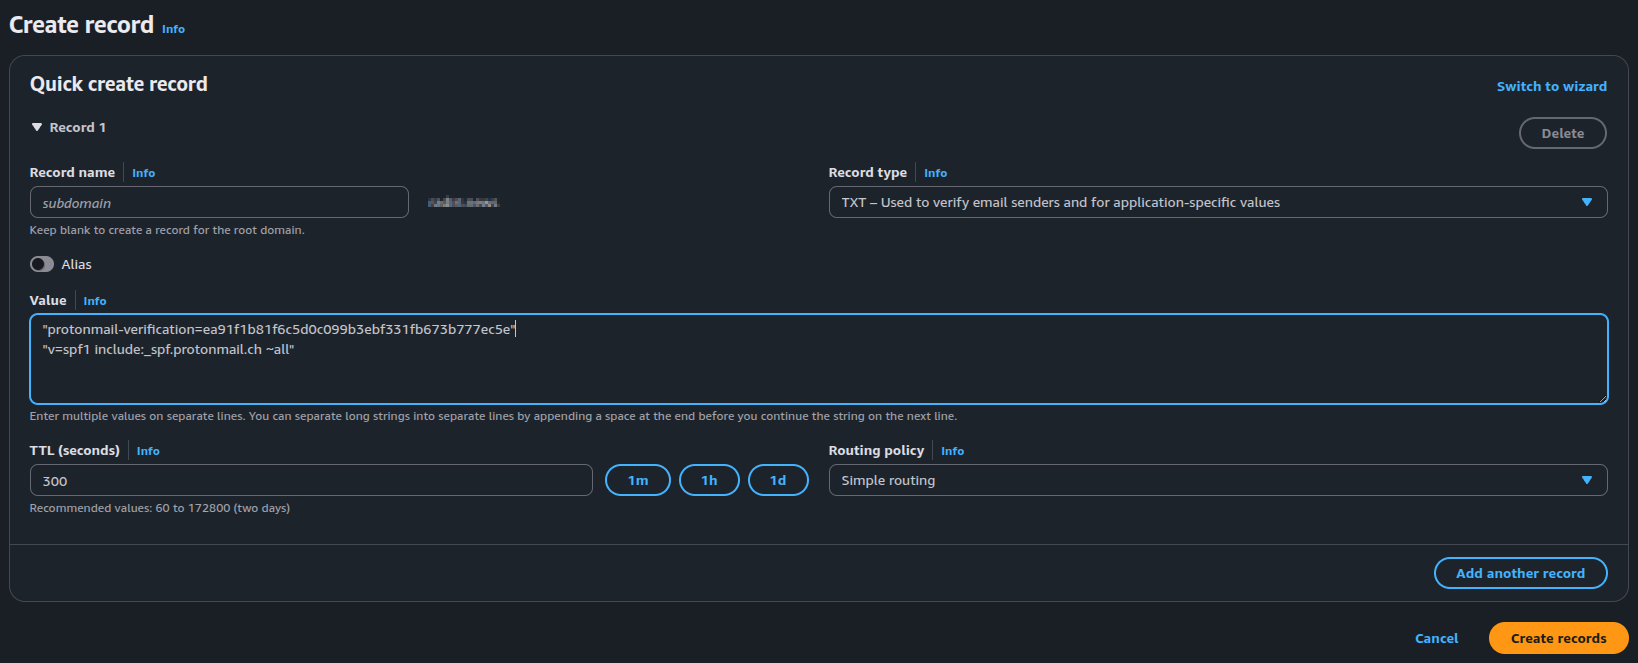
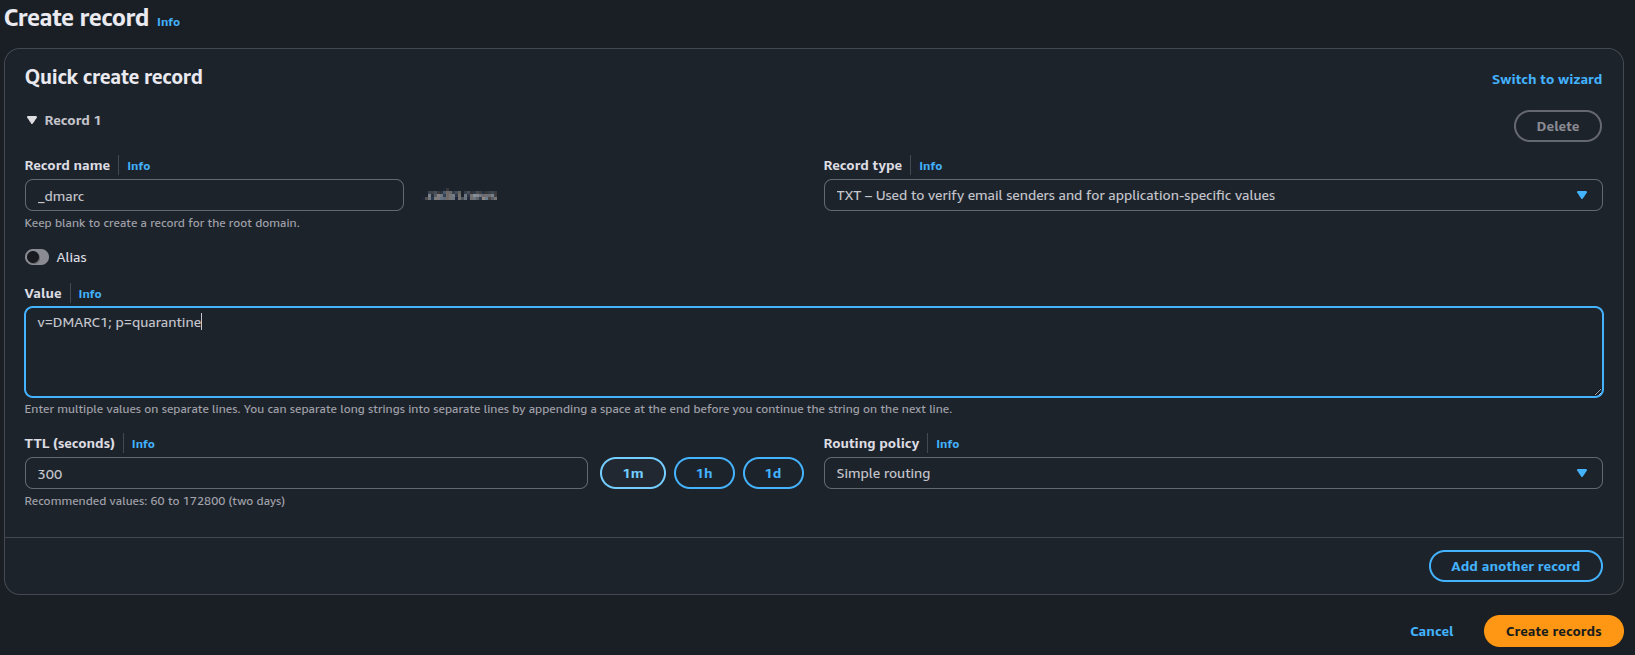
For DMARC you add a TXT entry for a subdomain named _dmarc, like this:
Step 5: CNAME entries
Finally, you need three distinct CNAME entries, each for a separate subdomain:
protonmail._domainkeyprotonmail2._domainkeyprotonmail3._domainkey
Proton will tell you the value for each of them.
Final Check
Proton Mail will show you whether you set up every part correctly. It looks something like this when it's all correct:
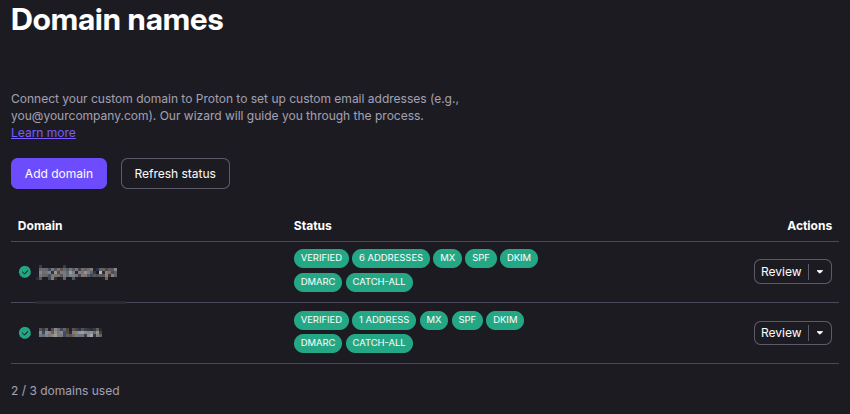
The above is for two domains, and has CATCH-ALL configurations which are optional. (They are independent of DNS settings and defined by clicking "Set catch-all" in the Actions menu. The option becomes available once the basic TXT verification step has completed.)
It might take a few minutes before Proton has confirmed all the DNS settings.
Other DNS Records
In case you have any doubts: It's fine to have further DNS records for other services (such as a webserver for the domain--in which case you'll have A and AAAA entries for the blank subdomain name, in addition to the MX and TXT entries).